ใส่ในแท็บ Script ในหัวข้อ DHCP Server
:local queueName "Client- $leaseActMAC";
:if ($leaseBound = "1") do={
/queue simple add name=$queueName target=($leaseActIP . "/32") max-limit=40M/40M comment=[/ip dhcp-server lease get [find where active-mac-address=$leaseActMAC && active-address=$leaseActIP] host-name];
} else={
/queue simple remove $queueName
}
วันอังคารที่ 12 พฤษภาคม พ.ศ. 2563

วันศุกร์ที่ 31 พฤษภาคม พ.ศ. 2562
[MikroTik] เข้าทางไหน ออกทางนั้น
redirect incoming traffic in wan1 and wan2 to the local server
/ip firewall nat add chain=dstnat protocol=tcp dst-port=22 in-interface=wan1 action=dst-nat to-addresses=192.168.0.1 to-ports=22
/ip firewall nat add chain=dstnat protocol=tcp dst-port=22 in-interface=wan2 action=dst-nat to-addresses=192.168.0.1 to-ports=22what comes from wan1, gets out from wan1
/ip firewall mangle add action=mark-connection chain=input in-interface=wan1 new-connection-mark=wan1_conn passthrough=yes disabled=no comment="in wan1,out wan1"
/ip firewall mangle add action=mark-routing chain=output connection-mark=wan1_conn new-routing-mark=wan1_traffic passthrough=no disabled=no comment="in wan1,out wan1"what comes from wan2, gets out from wan2
/ip firewall mangle add action=mark-connection chain=input in-interface=wan2 new-connection-mark=wan2_conn passthrough=yes disabled=no comment="in wan2,out wan2"
/ip firewall mangle add action=mark-routing chain=output connection-mark=wan2_conn new-routing-mark=wan2_traffic passthrough=no disabled=no comment="in wan2,out wan2"port forwards from wan1, gets out from wan1
/ip firewall mangle add action=mark-connection chain=forward in-interface=wan1 connection-state=new new-connection-mark=wan1_pfw passthrough=no disabled=no comment="pfw wan1, out wan1"
/ip firewall mangle add action=mark-routing chain=prerouting in-interface=lan connection-mark=wan1_pfw new-routing-mark=wan1_traffic passthrough=no disabled=no comment="pfw wan1, out wan1"port forwards from wan2, gets out from wan2
/ip firewall mangle add action=mark-connection chain=forward in-interface=wan2 connection-state=new new-connection-mark=wan2_pfw passthrough=no disabled=no comment="pfw wan2, out wan2"
/ip firewall mangle add action=mark-routing chain=prerouting in-interface=lan connection-mark=wan2_pfw new-routing-mark=wan2_traffic passthrough=no disabled=no comment="pfw wan2, out wan2"routing rules for wan1_traffic and wan2_traffic
/ip route add dst-address=0.0.0.0/0 gateway=wan1 distance=1 routing-mark=wan1_traffic disabled=no
/ip route add dst-address=0.0.0.0/0 gateway=wan2 distance=1 routing-mark=wan2_traffic disabled=noCredit: MikroTik Tutoroial.
วันอังคารที่ 8 พฤษภาคม พ.ศ. 2561
This file is in a location outside your local network.
1) Select 'Control Panel'/'Internet Properties'/'Security' tab.
(Alternatively, open Internet Explorer and select 'Tools'/'Internet Options'/'Security' tab.)
2) Highlight 'Local Intranet' and click 'Sites'.
3) Set the following:
Uncheck 'Automatically detect intranet network'.
Check 'Include all local (intranet) sites not listed in other zones'.
Uncheck 'Include all sites that bypass the proxy server'.
Check 'Include all network paths (UNCs)'.
4) Click 'Advanced'
5) Uncheck 'Require server verification (https:) for all sites in this zone'.
6) In the field labeled 'Add this web site to the zone:', add your local, private subnet using an asterisk for a network mask and click 'Add'. E.g. If your home (local) network is 192.168.25.0 with a mask of 255.255.255.0, enter '192.168.25.*' (without the quotes).
Notes for adding to this list:
Entries can be:
Individual IP addresses (e.g. '192.168.5.25', etc.),
Class C subnets (e.g. '192.168.27.*'),
Class B subnets (e.g. '172.16.*.*'), or
Class A subnets (e.g. '10.*.*.*')
You can add as many addresses as you need to the list
It can be handy add the address of a VPN subnet to the list if it is also private and you TOTALLY trust it.
7) Close out with 'Close'/'OK'/'OK' and close the Control Panel (or Internet Explorer).
วันพฤหัสบดีที่ 1 กุมภาพันธ์ พ.ศ. 2561
Guest access in SMB2 disabled by default in Windows 10 Fall Creators Update and Windows Server 2016 version 1709
Symptoms
In Windows 10 Fall Creators Update and Windows Server version 1709, the SMB2 client no longer allows the following actions:
- Guest account access to a remote server
- Fallback to the Guest account after invalid credentials are provided
SMBv2 has the following behavior in Windows 10 Fall Creators Update and Windows Server 2016 version 1709:
- Windows 10 Enterprise and Windows 10 Education no longer allow a user to connect to a remote share by using guest credentials by default, even if the remote server requests guest credentials.
- Windows Server 2016 Datacenter and Standard edition no longer allow a user to connect to a remote share by using guest credentials by default, even if the remote server requests guest credentials.
- Windows 10 Home and Professional editions are unchanged from their previous default behavior.
If you try to connect to devices that request credentials of a guest instead of appropriate authenticated principals, you may receive the following error message:
You can't access this shared folder because your organization's security policies block unauthenticated guest access. These policies help protect your PC from unsafe or malicious devices on the network.
Resolution
If you want to enable insecure guest access, you can configure the following Group Policy settings:
Computer configuration\administrative templates\network\Lanman Workstation
"Enable insecure guest logons"
Note By enabling insecure guest logons, this setting reduces the security of Windows clients.
วันพุธที่ 24 มกราคม พ.ศ. 2561
บังคับเว็บออก redirect จาก http เป็น https โดยใช้ mod_rewrite
เช็คว่า mod_rewrite ทำงานหรือเปล่า (เพราะเป็น default on อยู่แล้ว)
จะต้องมีบรรทัดเขียนว่า
ถ้าไม่มีให้เพิ่ม rewrite_module ลงในไฟล์
/etc/httpd/conf.modules.d/00-base.conf
เพิ่มบรรทัดนี้ลงในไฟล์ httpd.conf
จากนั้น restart httpd
httpd -M
จะต้องมีบรรทัดเขียนว่า
...
rewrite_module (shared)
...
ถ้าไม่มีให้เพิ่ม rewrite_module ลงในไฟล์
/etc/httpd/conf.modules.d/00-base.conf
...
LoadModule rewrite_module modules/mod_rewrite.so
...
เพิ่มบรรทัดนี้ลงในไฟล์ httpd.conf
RewriteEngine On
RewriteCond %{HTTPS} off
RewriteRule (.*) https://%{SERVER_NAME}/$1 [R,L]
จากนั้น restart httpd
วันศุกร์ที่ 19 มกราคม พ.ศ. 2561
Script สั่ง Reboot MikroTik
ไปที่ System > Scripts
สร้าง Script ใหม่ ตั้งชื่อตามต้องการ เช่นชื่อ reboot
ช่อง Policy ให้เลือก Reboot
ช่อง Source พิมพ์ /system reboot

ไปที่ System > Scheduler
สร้าง Schedule ใหม่ ตั้งชื่อตามต้องการ เช่น reboot
ช่อง Start Time เลือก startup
ช่อง Interval ตั้งเวลาตามต้องการ
ช่อง Policy ให้เลือก Reboot
ช่อง On Event ให้ใส่ชื่อ Script ที่เราตั้งไว้ก่อนหน้า จากตัวอย่างคือ reboot

สร้าง Script ใหม่ ตั้งชื่อตามต้องการ เช่นชื่อ reboot
ช่อง Policy ให้เลือก Reboot
ช่อง Source พิมพ์ /system reboot
ไปที่ System > Scheduler
สร้าง Schedule ใหม่ ตั้งชื่อตามต้องการ เช่น reboot
ช่อง Start Time เลือก startup
ช่อง Interval ตั้งเวลาตามต้องการ
ช่อง Policy ให้เลือก Reboot
ช่อง On Event ให้ใส่ชื่อ Script ที่เราตั้งไว้ก่อนหน้า จากตัวอย่างคือ reboot
วันพุธที่ 20 ธันวาคม พ.ศ. 2560
Webmin Error 14 Peer cert cannot be verified or peer cert invalid
Add “sslverify=false” in the ‘/etc/yum.conf’ file to solve this.
วันจันทร์ที่ 29 พฤษภาคม พ.ศ. 2560
This app can't open
This app can't open
XXX can't be opened using the Built-in Administrator account. Sign in with a difference account and try again.

XXX can't be opened using the Built-in Administrator account. Sign in with a difference account and try again.

- ไปที่ Local Security Policy
- Local Policies
- Security Options
- ทำการ Enabled ที่ตัวเลือก
- User Account Control: Admin Approval Mode for the built-in Administrator account
- User Account Control: Allow UIAccess applications to prompt for elevation without using the secure desktop
- Restart
วันพฤหัสบดีที่ 16 มิถุนายน พ.ศ. 2559
CentOS autologin
edit the file at /etc/gdm/custom.conf
vi /etc/gdm/custom.conf
You need to edit the daemon section of the file and add or change these:
[daemon]
AutomaticLoginEnable=true
AutomaticLogin=root
Just reboot your computer and you will automatically login.
vi /etc/gdm/custom.conf
You need to edit the daemon section of the file and add or change these:
[daemon]
AutomaticLoginEnable=true
AutomaticLogin=root
Just reboot your computer and you will automatically login.
วันอังคารที่ 8 มีนาคม พ.ศ. 2559
QlikView : Class
ฟังก์ชันเกี่ยวกับการแบ่งตัวแปรออกเป็นช่วงๆ ตามที่เราต้องการ โดยอยู่ในรูปแบบ a < x <= b
Syntax:
Class(expression, interval [, label [, offset]])
| interval | ความกว้างของช่วง |
| label (optional) | คำที่จะมาแทน x |
| offset (optional) | จุดเริ่มต้นที่จะมาใช้แทนค่าปกติ ซึ่งตั้งไว้ที่ 0 |
| ตัวอย่าง | ผลลัพธ์ |
| Class(23,10) |
20 < x <= 30
(แบ่งช่วงทุก 10 เริ่มต้นจาก 0 เพราะฉะนั้น ค่าดังกล่าวจึงตกอยู่ในช่วง 20 - 30) |
| Class (23,5,'อายุ') |
20 < อายุ <= 25
(แบ่งช่วงทุก 5 เริ่มต้นจาก 0 และแทน x ด้วยคำว่า'อายุ' เพราะฉะนั้น ค่าดังกล่าวจึงตกอยู่ในช่วง 20 - 25) |
| Class (23,10,'อายุ',5) |
15 < อายุ <= 25
(แบ่งช่วงทุก 10 เริ่มต้นจาก 5 และแทนค้า x ด้วยคำว่า 'อายุ' เพราะฉะนั้น ค่าดังกล่าวจึงตกอยู่ในช่วง 15 - 25 โดยช่วงเริ่มต้นคือ 5 - 15) |
QlikView : MonthName
ฟังก์ชันที่ใช้งานบ่อยในการสร้าง Object ในโปรแกรม QlikView คือการกำหนด Dimension ที่จำแนกตามเดือน เช่น จำนวนผู้รับบริการจำแนกรายเดือน, แนวโน้มผู้มารับบริการจำแนกรายเดือน ซึ่งปกติ ข้อมูลของเรามักจะไม่มี field ที่เป็นเดือนที่มารับบริการโดยตรง แต่จะเป็น field ที่เป็น วัน/เดือน/ปี ที่มารับบริการมากกว่า ดังนั้น หากต้องการจำแนกรายเดือน ฟังก์ชันที่ใช้ในการจำแนกก็คือ MonthName
Syntax:
MonthName(date[,period_no])
| date | คือ ฟิลด์ที่มีลักษณะของวันที่ที่เราต้องการ |
| period_no (optional) | คือ ค่าตัวเลขที่เราจะระบุลงไป โดย หากเป็นเลขติดลบ จะเป็นเดือนก่อน หากเป็นเลขบวกจะเป็นเดือนถัดไป |
| ตัวอย่าง | ผลลัพธ์ |
| MonthName('31/12/2000') | Nov 2000 |
| MonthName('31/12/2000',-1) | Dec 2000 |
วันศุกร์ที่ 4 มีนาคม พ.ศ. 2559
ตั้งค่า iOS 9 อย่างไรให้ไหลลื่นในเครื่องเก่า
1. Reduce Transparency
- ไปที่ Settings > General- ไปที่หัวข้อ Accessibility


2. Reduce Motion
- ไปที่ Settings > General- ไปที่หัวข้อ Accessibility


3. ปิดแอพที่ทำงานอยู่เบื้องหลัง
- ให้กดปุ่ม Home ติดกัน 2 ครั้ง เพื่อเปิดดูว่ามีแอพไหนทำงานอยู่ในหน่วยความจำบ้าง จากนั้นให้ปัดแอพที่ไม่ต้องการขึ้นเพื่อปิดแอพ4. ปิดการทำงานของ Background App Refresh
- ไปที่ Settings- เลื่อนลงมาด้านล่างจะเจอการตั้งค่าแอพทั้งหมดอยู่

5. ปิดการใช้งาน Siri
- ไปที่ Settings > General- ไป Spotlight Search

ทั้งนี้ทั้งนั้น หากหาเมนู Settings ตัวไหนไม่เจอ เนื่องจากความแตกต่างระหว่าง iPhone กับ iPad ให้พิมพ์คำสะคัญในช่องค้นหาที่หน้า Settings ได้เลย
วันศุกร์ที่ 6 พฤศจิกายน พ.ศ. 2558
Explain the significance of “dead beef”
Explain the significance of “dead beef”
Answer: DEADBEEF is a hexadecimal value that has was used in debugging back in the mainframe/assembly days because it was easy to see when marking and finding specific memory in pages of hex dumps. Most computer science graduates have seen this at least in their assembly language classes in college and that’s why they expect software engineers to know it. From wikipedia:
“0xDEADBEEF (“dead beef”) is used by IBM RS/6000 systems, Mac OS on 32-bit PowerPC processors and the Commodore Amiga as a magic debug value. On Sun Microsystems’ Solaris, it marks freed kernel memory. On OpenVMS running on Alpha processors, DEAD_BEEF can be seen by pressing CTRL-T.[3]”
วันจันทร์ที่ 26 ตุลาคม พ.ศ. 2558
Windows 10 Cannot Open Other Computer in Network
1. gpedit.msc > Computer Configuration > Windows Settings > Security Settings > Local Policies > Security Options > Network access: Sharing and security model for local accounts
2. A fix for this issue appears to be setting HKLM\SYSTEM\CurrentControlSet\Services\LanmanWorkstation\Parameters\AllowInsecureGuestAuth (DWORD) to 1.
วันอังคารที่ 13 ตุลาคม พ.ศ. 2558
Code สำหรับสุ่ม vn สำหรับตรวจสอบ แพทย์ละ 10 vn
SELECT name, vn, hn, vstdate
FROM (
SELECT name, vn, hn, vstdate,
@num := IF(@doc = name, @num + 1, 1) AS row_number,
@doc := name AS dummy
FROM vn_stat
LEFT OUTER JOIN doctor ON doctor.code = vn_stat.dx_doctor
WHERE vstdate BETWEEN "2015-09-01" AND "2015-09-30"
AND position_id = "1"
ORDER BY dx_doctor
) AS x WHERE x.row_number <= 10;
วันพุธที่ 8 กรกฎาคม พ.ศ. 2558
Connect to iTunes to use Push Notifications
วันนี้ได้โจทย์ใหม่มา หลังจากเปิดแอพใน IOS จะมี Dialogue ขึ้นมาว่า
Connect to iTunes to use Push Notifications
วิธีแก้ง่ายๆ (จากการค้นหาในอินเตอร์เน็ต) ดังนี้
- เข้า Setting > iTunes
- Logout ออกจากระบบก่อน
- ปิดเครื่อง 1 ครั้ง จากนั้นเปิดขึ้นมาใหม่
- เข้า Setting > iTune อีกครั้ง
- login เข้า iTunes ใหม่เป็นอันใช้ได้
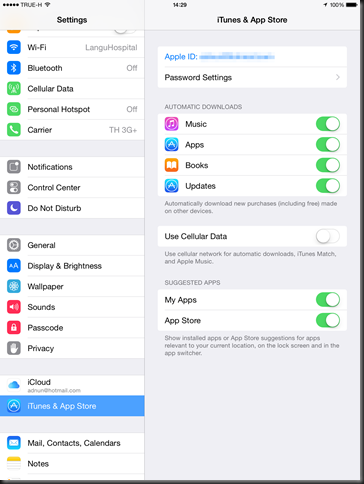
มีบาง comment บอกว่าให้ใช้วิธี backup & restore ใหม่ผ่าน iTune บนคอมพิวเตอร์ ท่าทางจะยาก เอาวีธีข้างบนน่ะแหละ ง่ายกว่า
วันพุธที่ 11 มีนาคม พ.ศ. 2558
ลบรายชื่อเด็กที่ลงทะเบียนเข้าบัญชี 3
เรื่องมีอยู่ว่า รพ.มะนัง ปรึกษาว่าในบัญชี 3 (ทะเบียน Well baby Clinic) มีรายชื่อคนนอกเขตรับผิดชอบเข้ามาโดยไม่ทราบง่าใครเพิ่ม
เลยทำการ สั่ง Query เพื่อหาเด็กนอกเขตในบัญชี เพื่อลบออก
เลยทำการ สั่ง Query เพื่อหาเด็กนอกเขตในบัญชี เพื่อลบออก
select pw.* from person_wbc pwอันนี้เป็น Script Query เผื่อครั้งหน้ามีอีก
left outer join person p on pw.person_id = p.person_id
left outer join village v on p.village_id = v.village_id
where v.village_id not in ("1","3","11","23")
order by v.village_moo
วันศุกร์ที่ 11 เมษายน พ.ศ. 2557
Install FTP Server on CentOS
ขั้นแรก การ Install FTP Server ใช้คำสั่ง
yum install vsftp ftp
หลังจากติดตั้ง ทำการ config ไฟล์ /etc/vsftpd/vsftpd.conf ดังนี้
เปลี่ยนค่าเป็น NO ใน anonymous_enable=NO
เอาคอมเมนท์ออกจาก ascii_upload_enable=YES และ ascii_download_enable=YES
สุดท้ายเพิ่มบรรทัดว่า use_localtime=YES
เซฟไฟล์คอมฟิกแล้วสั่งรัน service
service vsftpd start
chkconfig vsftpd on
เป็นอันเสร็จเรียบร้อย
Install FTP Server on CentOS
ขั้นแรก การ Install FTP Server ใช้คำสั่ง
yum install vsftp ftp
หลังจากติดตั้ง ทำการ config ไฟล์ /etc/vsftpd/vsftpd.conf ดังนี้
เปลี่ยนค่าเป็น NO ใน anonymous_enable=NO
เอาคอมเมนท์ออกจาก ascii_upload_enable=YES และ ascii_download_enable=YES
สุดท้ายเพิ่มบรรทัดว่า use_localtime=YES
เซฟไฟล์คอมฟิกแล้วสั่งรัน service
service vsftpd start
chkconfig vsftpd on
เป็นอันเสร็จเรียบร้อย
วันอังคารที่ 8 เมษายน พ.ศ. 2557
การตรวจสอบข้อมูล One Stop Service กับแฟ้ม Service ที่ถูกส่งออกมา
วันนี้ได้รับโจทย์จาก รพ.สต.ในเครือข่าย ว่าอยากจะดูข้อมูลแฟ้ม SERVICE.TXT ที่ถูกส่งออกจาก 21 แฟ้ม เนื่องจากตรวจสอบกับหน้า One Stop Service ใน HOSxP PCU แล้วได้ข้อมูลไม่เท่ากัน
ในแฟ้ม SERVICE ที่ถูกส่งออกมามีข้อมูล 788 Record ขณะที่ข้อมูลจากหน้า One Stop Service มี 803 Record
แล้วข้อมูลที่ไม่ถูกส่งออกล่ะ? คือ Record ไหน? จะตรวจสอบได้อย่างไร? ถ้ามานั่งไล่ราย Record คงตาลายพอดี หากข้อมูลเยอะกว่านี้ก็ ไมเป็นอันทำอะไรแล้ว
ความรู้ที่มีและพอจะนึกออกได้ ก็คือการนำเข้ามาหาข้อมูลใน Excel โดยใช้ฟังก์ชัน VLOOKUP ช่วย
งั้นลองมาทำดูดีกว่า
ส่งออกข้อมูลจากหน้า One Stop Service โดยใช้ปุ่ม Excel

จะได้ข้อมูลไฟล์ Excel ออกมา ซึ่งมีข้อมูลเช่นเดียวกับหน้า One Stop Service

ขั้นต่อมาคือการนำเอาไฟล์ SERVICE.TXT ที่ได้จาก 21 แฟ้ม มาแปลงเป็น Excel ในที่นี้ขอใช้ Excel เวอร์ชัน 2013 นะครับ
เลือกแท็บ Data แล้วเลือก Get External Data From Text ตามภาพ

จะมีหน้าต่างให้เลือกไฟล์ขึ้นมา เลือกไฟล์ SERVICE.TXT จาก 21 แฟ้มที่ส่งออกมา กดปุ่ม Import

เลือก Encoding เป็นภาษาไทย จากนั้นกด Next

เลือก Delimiters เป็นสัญลักษณ์ Pipe (|) เพื่อให้แบ่งคอลัมน์ Excel ตามโครงสร้างของ 21 แฟ้ม กด Next

หน้านี้ยังไม่ต้องทำอะไร กด Finish ผ่านไปได้เลย

โปรแกรม Excel จะถามว่าให้นำเข้าที่ Worksheet ไหน ให้เลือก New Worksheet แล้วกด OK

จะเห็นว่าเราจะได้ Worksheet เพิ่มมาอีก 1 sheet ชื่อว่า Sheet1 ตรงนี้สามารถเปลี่ยนชื่อได้ครับ เพื่อให้เข้าใจง่าย ขอเปลี่ยนเป็นชื่อว่า Service นะครับ

ขั้นตอนการใช้งาน VLOOKUP มีหลักการดังนี้

Lookup_value คือค่าที่ต้องการให้ไปหา ในกรณีนี้คือการใช้ SeqID จากข้อมูลที่ Export จาก One Stop Service
Table_array คือ ช่วงข้อมูลที่จะให้ไปหา โดยคอลัมน์แรกจะต้องตรงกับ Lookup_value ที่เราหา และ จะต้องเป็นข้อมูลประเภทเดียวกัน และ ช่วงข้อมูลนี้จะต้องเรียงลำดับด้วย
Col_index_num คือ ลำดับคอลัมน์ในช่วงของ Table_array ที่จะนำค่ามาแสดง
Range_lookup คือ การระบุว่าค่าที่ค้นหาจะต้องตรงตามข้อมูลเลยหรือไม่ โดยมีค่าเป็น True คือไม่ต้องตรงก็ได้ เอาค่าใกล้เคียงมาแสดง และหากเป็น False จะต้องค่าตรงกับที่ระบุใน Lookup_value เท่านั้น
ดังนั้นขั้นแรกก่อนใช้งานฟังก์ชันดังกล่าวต้องมาเตรียมตารางสำหรับ Lookup ก่อน โดนใช้ Sheet ชื่อ Service ที่เพิ่งนำเข้ามานั่นเอง
จากหน้า Sheet Service ให้กดเมนู Data > Filter

เลือกคอลัมน์ C ซึ่งเป็นคอลัมน์ของข้อมูล SEQ ที่เราจะใช้เป็นตาราง Lookup แล้วเลือกเรียงลำดับจากน้อยไปมาก
![2557-04-08 17_30_44-onestopservice_export (1).xls [Compatibility Mode] - Excel](https://blogger.googleusercontent.com/img/b/R29vZ2xl/AVvXsEh6GhNz3ypkqAUzi71s1YU9DBlkNGZa-8LqbMQD4OqrRBTg8LtsUz0EEy27zklgcB9NceZckRwMUW-r8q2Wh4HakCAyGlp-bWUZPOh1NvCSvILhwTenMrtjFvwwJrgya8h-tIWgI3CLuCM/s1600-h/2557-04-08%25252017_30_44-onestopservice_export%252520%2525281%252529.xls%252520%252520%25255BCompatibility%252520Mode%25255D%252520-%252520Excel%25255B5%25255D.png "2557-04-08 17_30_44-onestopservice_export (1).xls [Compatibility Mode] - Excel")
กลับมาที่ Sheet Onestopservice_export กดเมนู Data > Filter เช่นเดียวกันกับ Sheet Service
ทำการซ่อนข้อมูลที่ไม่จำเป็น เพื่อให้ง่ายต่อการมอง

เลือกคอลัมน์ Q2 (คอลัมน์สุดท้ายของแถวแรกของข้อมูล) กดปุ่ม Fx เพื่อใส่สูตร
![2557-04-08 17_42_11-onestopservice_export (1).xls [Compatibility Mode] - Excel](https://blogger.googleusercontent.com/img/b/R29vZ2xl/AVvXsEiCkct1keGZY5uUWbLb_njknPQWpoB17EzEA_EdNRJTecoQG3BLC0j2qifIp_WMBOUF4URl_HOZS_W0_35B-T92gGIXhxjfTjmMWi6J-TEgvY52CjUEhMJQc43vMxsoVPGspsMWuuKB2JI/s1600-h/2557-04-08%25252017_42_11-onestopservice_export%252520%2525281%252529.xls%252520%252520%25255BCompatibility%252520Mode%25255D%252520-%252520Excel%25255B6%25255D.png "2557-04-08 17_42_11-onestopservice_export (1).xls [Compatibility Mode] - Excel")
ค้นหาคำว่า VLOOKUP หรือเลือกจากกล่ม Lookup & Reference

ค่า Lookup_value คือค่าที่เราจะหา ให้หาจาก SeqID ตรงกับเซลล์ F2
![2557-04-08 17_45_04-onestopservice_export (1).xls [Compatibility Mode] - Excel](https://blogger.googleusercontent.com/img/b/R29vZ2xl/AVvXsEjV_L5-QTIoLlK9hGzN0FAhpDDPvljKtlFUAQbNLWkVVHM3KD7jNfdIz_iu52GYyRvS_XB4J02LpGSm-dJIuGjGE41hn3SYphWMF1OeVMuyHzob-PUfLmSxEXSbOUGH3xWN29mvWyEFh2Y/s1600-h/2557-04-08%25252017_45_04-onestopservice_export%252520%2525281%252529.xls%252520%252520%25255BCompatibility%252520Mode%25255D%252520-%252520Excel%25255B5%25255D.png "2557-04-08 17_45_04-onestopservice_export (1).xls [Compatibility Mode] - Excel")
คลิกให้เคอร์เซอร์อยู่ในช่อง Table_array จากนั้น คลิก Sheet Service แล้วลากข้อมูลเพื่อเลือก SEQ มาเป็นตารางอ้างอิง
![2557-04-08 17_49_05-onestopservice_export (1).xls [Compatibility Mode] - Excel](https://blogger.googleusercontent.com/img/b/R29vZ2xl/AVvXsEh3vy03Dfd-nBmi1I7HmvpPwfSUxlkDKXI9EGs-HBFpu5rTNHo-A7PaxPuqUfb1eAyWawpMCgRu9nd3FykPpGyaMO64K4_sZ4K_d_lhytjK868lsg6A-ZjCzRCubrjmKI1KTjOq_nn7hr0/s1600-h/2557-04-08%25252017_49_05-onestopservice_export%252520%2525281%252529.xls%252520%252520%25255BCompatibility%252520Mode%25255D%252520-%252520Excel%25255B6%25255D.png "2557-04-08 17_49_05-onestopservice_export (1).xls [Compatibility Mode] - Excel")
มีข้อมูลใน Sheet Service อยู่กี่แถวก็ให้เลือกมาให้หมด ซึ่งจากภาพจะเลือกมาแค่คอลัมน์เดียว เพราะ จะเอาแค่คอลัมน์นี้มาแสดงผล ตามสูตรช่อง Col_index_num ก็เลยใส่ 1 คือคอลัมน์ที่ 1 และสุดท้าย Range_lookup ใส่ค่า FALSE เพื่อให้หาข้อมูลที่ตรงกันเท่านั้น จากนั้นกด OK

เราจะเห็นว่าค่าที่ได้คือ #N/A แสดงว่าข้อมูลในแถวนี้ไม่ได้ถูกส่งออกมาในแฟ้ม SERVICE ซึ่งสามารถไปตรวจสอบได้
ที่นี้เราจะทำการแก้ไขสูตรของ VLOOKUP เพื่อจะทำการคัดลอกไปใช้ในแถวอื่นๆ ด้วย ดังนี้
ให้ใส่เครื่องหมาย $ หน้าตัวแสดงตำแหน่งแถวและคอลัมน์ที่เป็น Table_array เพื่อตรึงค่าการค้นหาให้อยู่ช่วงนี้เท่านั้น
ก่อนใส่
![2557-04-08 17_56_19-onestopservice_export (1).xls [Compatibility Mode] - Excel](https://blogger.googleusercontent.com/img/b/R29vZ2xl/AVvXsEi2pABN7hyphenhyphenwm2bpOeOZMYrU24QHy8KCnYEUvlUEoIa-zC92xIk6dcHyCtW7F9TrWkf55NnJW4Gnyg2j6hBhoKD0KHAxhIfR1T5sSsl7g7U7CNp1JHPaXD_YBCK1HVHmEzAYxZ5jUPYzRwY/s1600-h/2557-04-08%25252017_56_19-onestopservice_export%252520%2525281%252529.xls%252520%252520%25255BCompatibility%252520Mode%25255D%252520-%252520Excel%25255B7%25255D.png "2557-04-08 17_56_19-onestopservice_export (1).xls [Compatibility Mode] - Excel")
หลังใส่
![2557-04-08 17_58_19-onestopservice_export (1).xls [Compatibility Mode] - Excel](https://blogger.googleusercontent.com/img/b/R29vZ2xl/AVvXsEglpLdn5cbj_k_5eGIJY0CDUniqVAnzPPg8gq0rXVJXuLem2XdznAfE65jXjwML50f-jqSj1-9jUG1GHTU7-fDQCpNSSjb6_ObhmiL-8N0r0hRDYDt6yPVM8ZH2snQzzLjVJpxiKdnrfUs/s1600-h/2557-04-08%25252017_58_19-onestopservice_export%252520%2525281%252529.xls%252520%252520%25255BCompatibility%252520Mode%25255D%252520-%252520Excel%25255B4%25255D.png "2557-04-08 17_58_19-onestopservice_export (1).xls [Compatibility Mode] - Excel")
จากนั้นจึงคัดลอกสูตรไปวางในแถวอื่นๆ ได้เลย
![2557-04-08 18_00_02-onestopservice_export (1).xls [Compatibility Mode] - Excel](https://blogger.googleusercontent.com/img/b/R29vZ2xl/AVvXsEgc__67n6yhU89Yr-5-aPgq_zx071-E2mBV3JteOp3KpZ-uprw2JJ4j5l9MDYQvUGcP-CZw9-hEHbcZXik2kfA7_jIpVOTnRdbcogdD4jUwFL9TGq1TvsceM4QvZseQSXhlEhX-nxLsC-M/s1600-h/2557-04-08%25252018_00_02-onestopservice_export%252520%2525281%252529.xls%252520%252520%25255BCompatibility%252520Mode%25255D%252520-%252520Excel%25255B4%25255D.png "2557-04-08 18_00_02-onestopservice_export (1).xls [Compatibility Mode] - Excel")
จะเห็นว่า ข้อมูลแถวที่มีค่าตาม Lookup_array จะแสดงค่า SEQ ให้เห็น ส่วนข้อมูลแถวไหนไม่พบใน Lookup_array ก็จะแสดงออกมาเป็น #N/A ดังภาพ เราก็สามารถเข้าไปตรวจสอบได้เลยว่าข้อมูลที่ไม่ถูกส่งออก อยู่ที่ไหน และทำการแก้ไขต่อไป
สมัครสมาชิก:
บทความ (Atom)